About contractor members
Contractor member is a term used to refer to a person in your organization that provides services to another organization, e.g. a delivery driver that delivers goods to a construction site. Typically they are members of your organization that are involved in providing goods or services as part of a contract.
The information that you can access is controlled by the business you are providing services for. You will not necessarily be able to see all of this information or edit everything you see.
Manage contractor members
To manage the members of your organization, select Members from the left-hand menu:
- Find specific members using the global search bar near the top of the page.
- To add a new member, click Add Member at the top of the page.
- To edit an existing member, click Edit next to their name.
- To delete a member, click Remove next to their name then OK on the confirmation pop-up.
- To filter the member list by induction status, click Advanced Search, then select a status.
The following tabs may be visible in the portal. If the organization you contract to uses custom fields, there may be additional tabs in your portal.
Profile Information
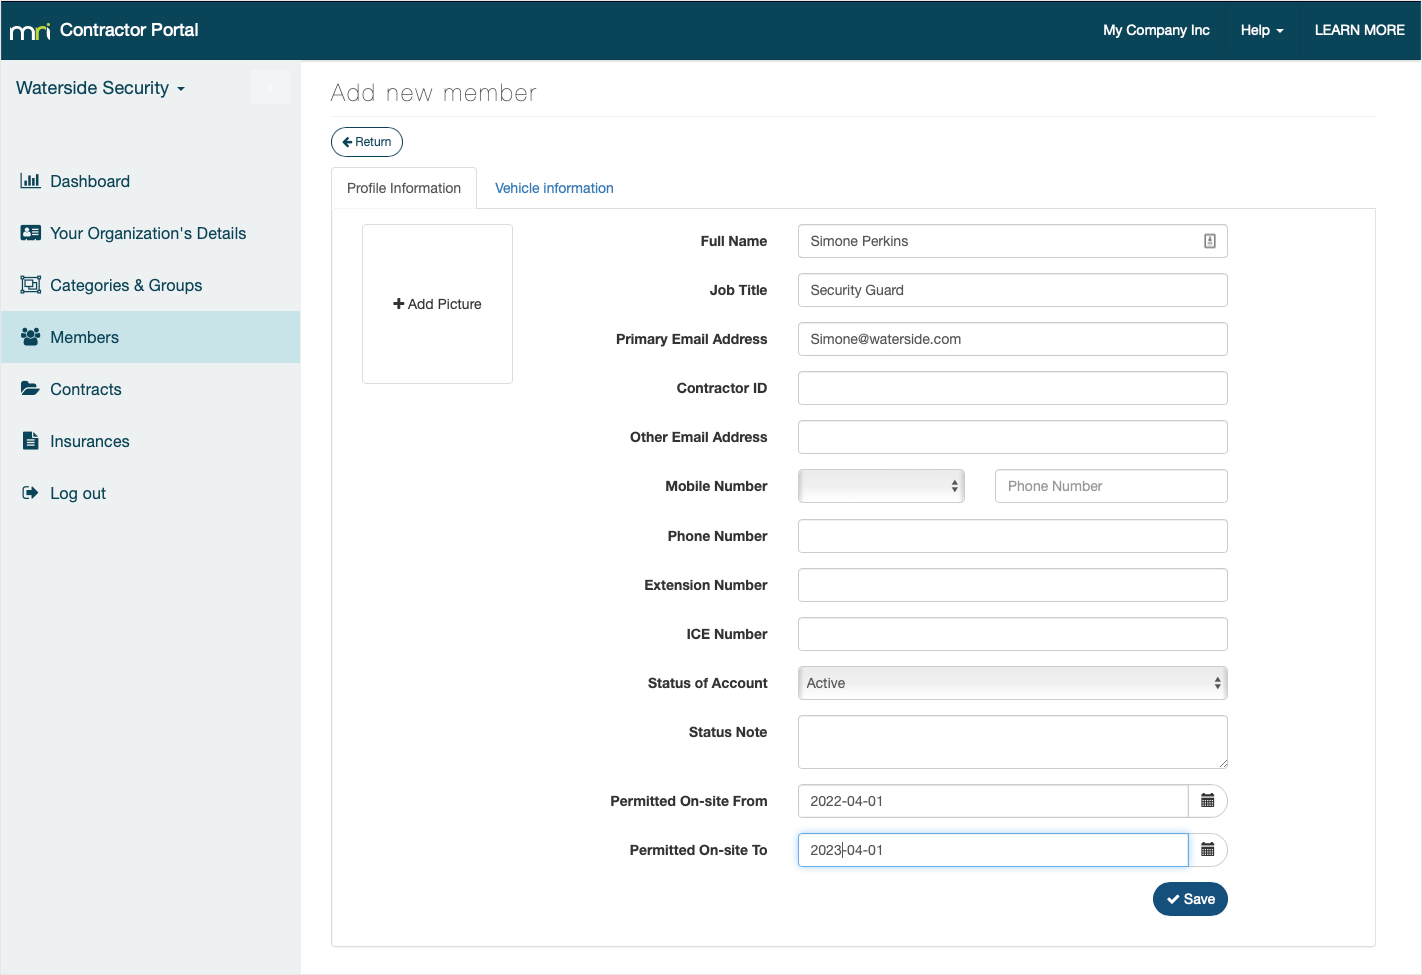
When you are adding or editing a member, the first tab you will land on is their profile page. The default fields you can manage are the contact details for your members, a photo of them, and their current status. Any fields marked with a red asterisk are required information.
Default fields
- Full Name – The member’s name. You must have a first and last name to add a member
- Contractor ID – Can be entered instead of a name during sign in/out on a Kiosk.
- Job Title – The member’s title in their organization
- Primary Email Address – This is used for contact, sending notifications, invitations, and inductions to the member
- Other Email Address – Can be used to send an induction or for contact records
- Mobile Number – This is used for contact, sending notifications, invitations, and inductions to the member
- Phone Number – For your contact records
- Extension Number – In case an extension is needed to reach the member at their phone number
- ICE Number – The number of the member’s emergency contact
- Permitted On-site From and Permitted On-site To – The date range that the member can access the site. These dates are optional, if they are blank, the member will always be considered valid.
- Status of Account – The status of the member in MRI OnLocation. Typically, an organization may not allow you to change the status unless they have reviewed the member information in the portal. The different status presented are Pending, Active, Inactive, On-Hold, and Banned. The member must have an active status to be able to sign in at the business.
Custom fields
You may see additional fields or tabs if the organization has added custom fields to their contractor member profiles. These fields are fully customizable and an organization can choose which fields members can see and/or edit. Some custom fields may have been marked as mandatory or set up to contain unique information.
The example below has a new tab labeled Vehicle Information, with two custom fields added to record the relevant vehicle information.

Add a picture
- Hover over Add Picture.
- Select Upload new picture.
- Select the photo from your computer and click Open.
- Adjust the selection area to best fit the photo.
- Click Apply.
- Click Save.
Contact role types
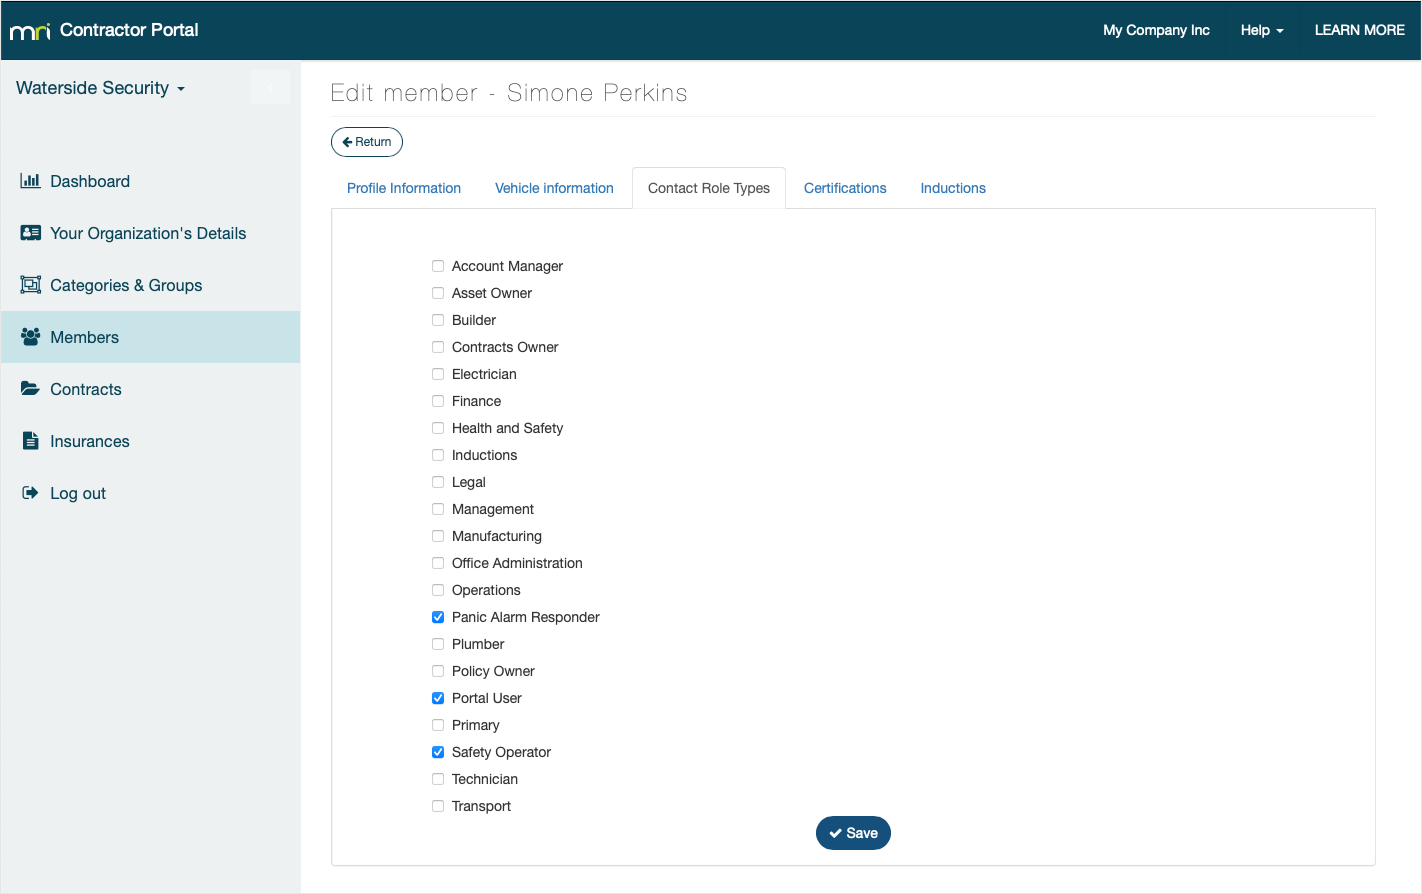
Contact role types are the roles that the member performs in your organization; these could be their job description, administration roles, or any other option that is available to you. The contact role type options are set up by the business you are contracting to and cannot be changed in this portal.
A few key roles that may be available to you are:
- Account Manager - The person in charge of maintaining your organization's contract
- Panic Alarm Responder - This person will be notified if a panic alarm is triggered in the business you are contracting to
- Safety Operator - This person can be selected as a Safety Operator on sign in for an employee or contractor and receive notifications to do with this
- Portal User - A person authorized to use the Contractor Portal. Being a Portal User does not mean that you have access to the portal, you need to be invited before you will have access
- Asset Owner - A person that has ownership over an asset that is registered in OnLocation
Use of these role types is completely optional for OnLocation accounts and may not be utilized by the business you are contracting to. If you're unsure about any options, and whether they are being used, you should first get in touch with your contact at the business.
Certifications
This is a section for entering a member’s relevant certifications for their work. The list of certifications is set up by the business you are contracting to.
Some certifications may be required by the business before your members can access their locations or do certain work. If you’re not sure what is required, contact the business you contract to.
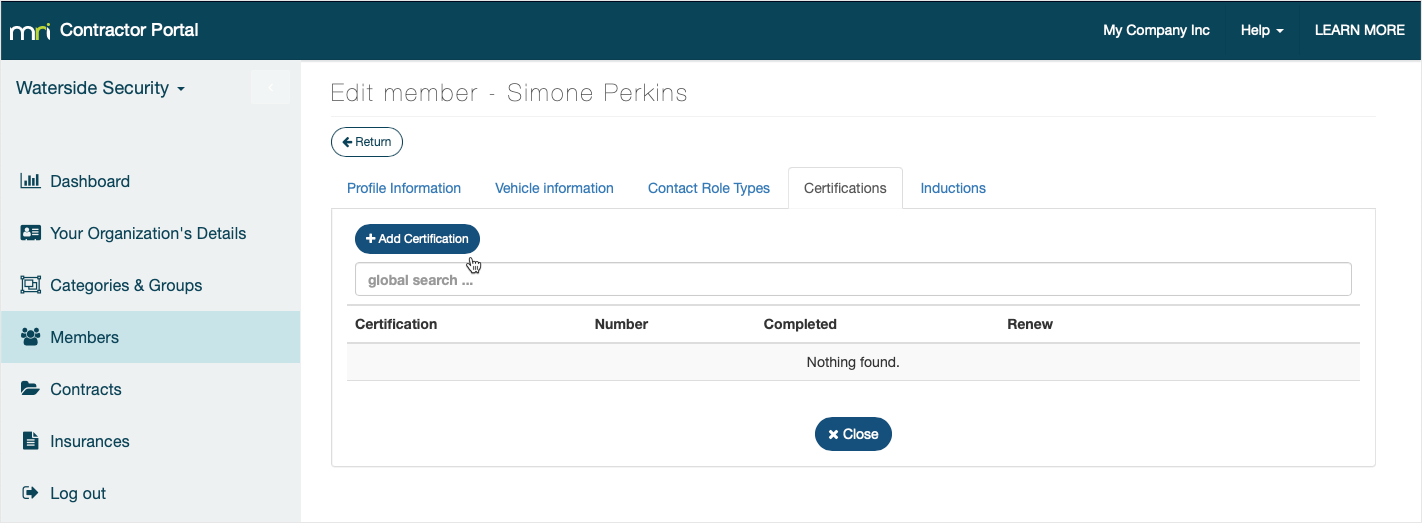
To add a certification, in the member’s profile:
- Select Members from the left-side menu.
- Select the Certifications tab.
- Click Add Certification.
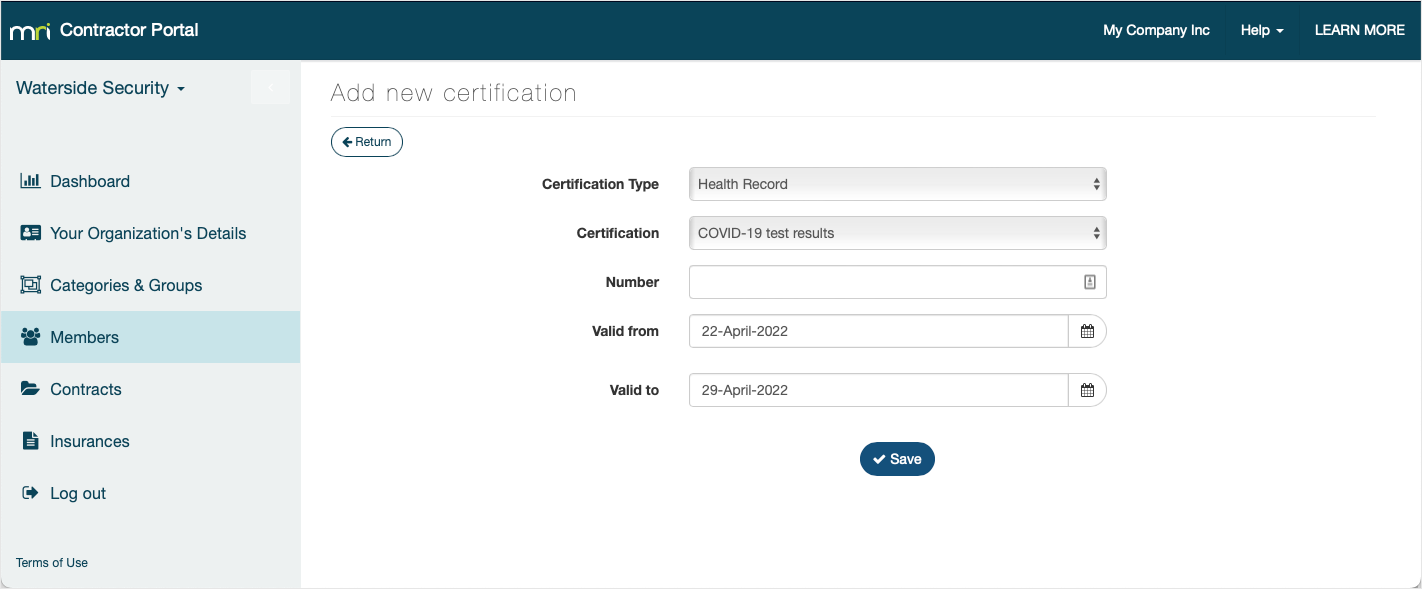
- Select the Certification Type.
- Select the Certification.
- (Optional) Enter a reference number.
- Enter the Valid from date.
- Enter the Valid to date.
- Click Save.
The certification details will be added to the member’s profile and you can now add a supporting document. You can upload PDF, DOC, DOCX, JPG, JPEG, PNG, or GIF file types.
From the list of the member’s certifications:
- Click the documents button next to a certification.
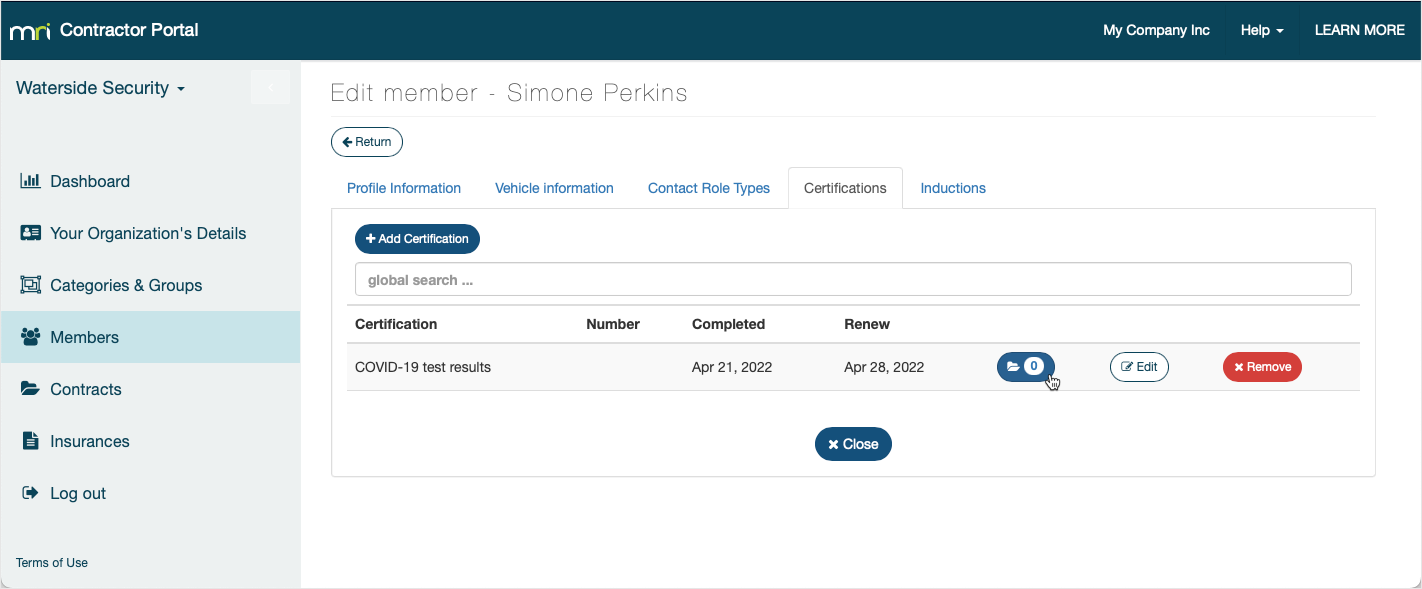
- Click Add Document.
- Select a file from your computer and click Open.
- Click Return.
The file will be automatically uploaded to the Contractor Portal and linked to the certification.
From the Certification tab, you can click the file icon to view the document or click Remove to delete it.
Click Return to go back to the member details.
OnLocation Mobile
OnLocation Mobile is a smartphone app used to sign in and out. If the organization you've contracted to uses the app, you may have permission to send the app activation code to other contractors in your organization.
To send an activation code:
- Select Members from the left-side menu.
- Select the OnLocation Mobile tab.
- Check they have an email address or mobile number listed in their profile. You may need to update this in the Profile Information tab if they don't.
- Click Send OnLocation Mobile code, then choose the sending method: Email, Text message, or Email and text message. The methods you see will depend on what's recorded in their profile.
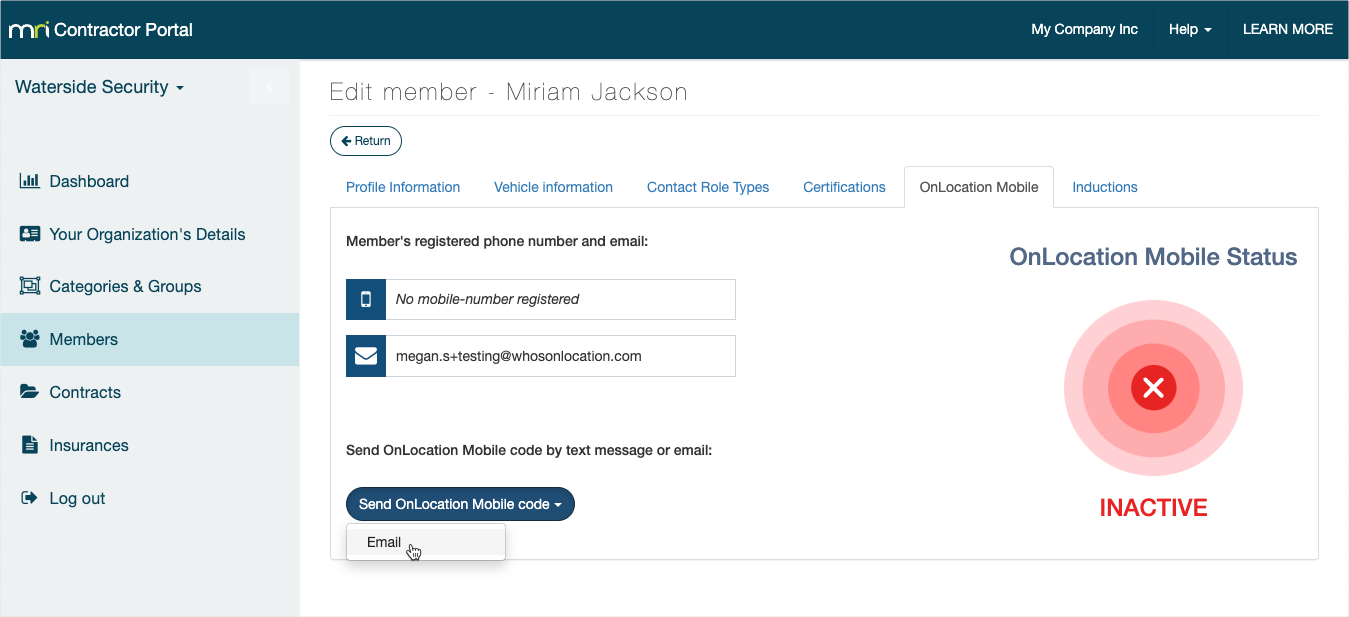
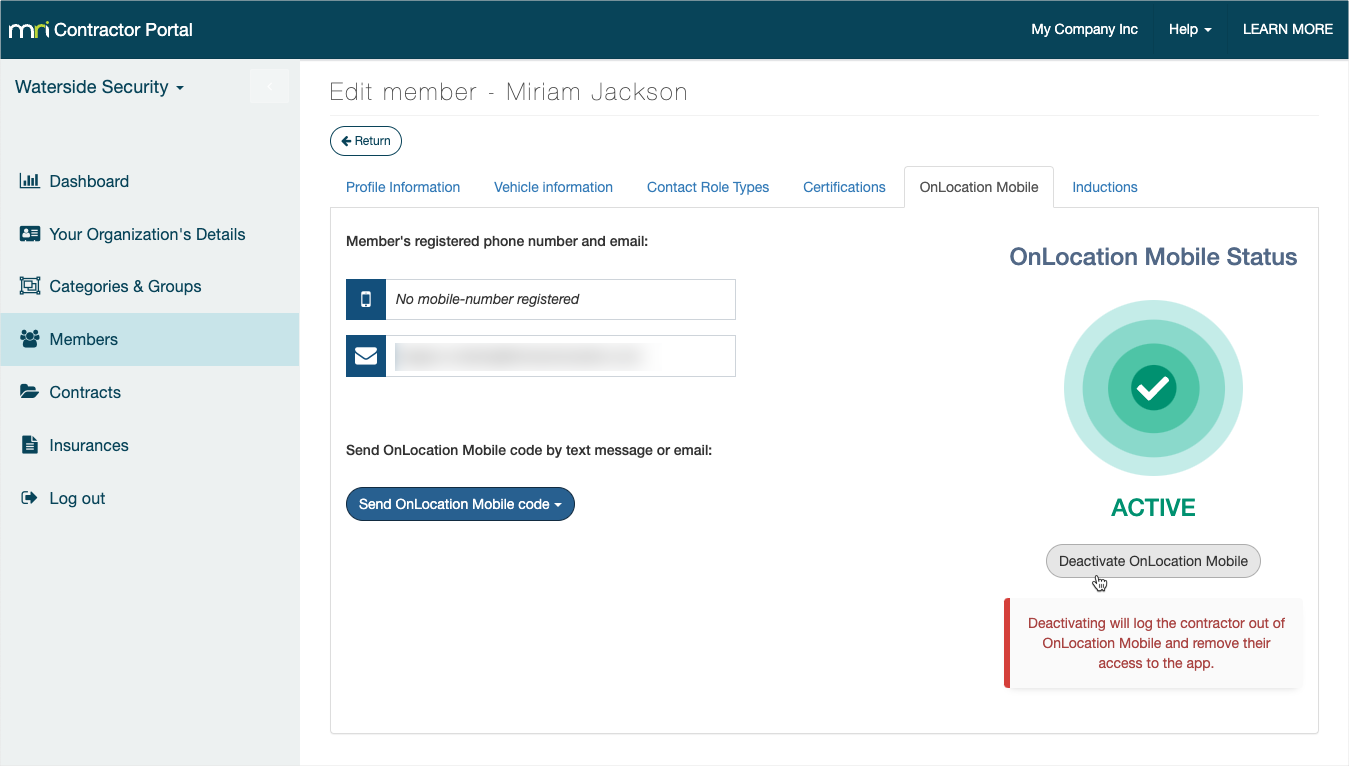
If you need to revoke their access in the future, click Deactivate OnLocation Mobile.
Inductions
This is a section where you can add internal or external inductions to a member’s profile or invite them to take online inductions.
All induction course options are set up by the business you are contracting to and may be required to get access to their locations. Induction courses that are not run by this business still need to be added as an option in the OnLocation system before you can record this in the Contractor Portal.
Expiry dates are set up when the induction course is added to OnLocation and will be automatically entered when an induction course is passed or manually added.
There are four types of induction courses:
- Internal - An induction course run by the business you are contracting to internally
- External - An induction course run by a third party or your organization, it is external to the business you are contracting to
- eLearning - An online induction course created by the business you are contracting to which is fully integrated with OnLocation. These induction courses can be completed online using unique links sent to members via email or text.
- SCORM Cloud - An online induction course that is competed using unique links sent to members via email or text.
All induction courses that are available to a member to add will be listed in the Inductions tab in their profile. You can manually add an induction course to the member’s profile or, for online induction courses, you can invite a member to take the course.
Invite a member to take an online induction
For online inductions, a member usually needs to be invited to take the course before it is added to their profile. When a member is sent an invite to the course, they receive a unique link that connects to their profile. This will automatically update the induction record when the course is passed or failed including when it was attempted and, if passed, when it needs to be renewed.
You can invite a member to take an online induction via email or text message, all induction courses can be sat on either desktops or mobile devices.
To invite a member:
- Click the invite icon.
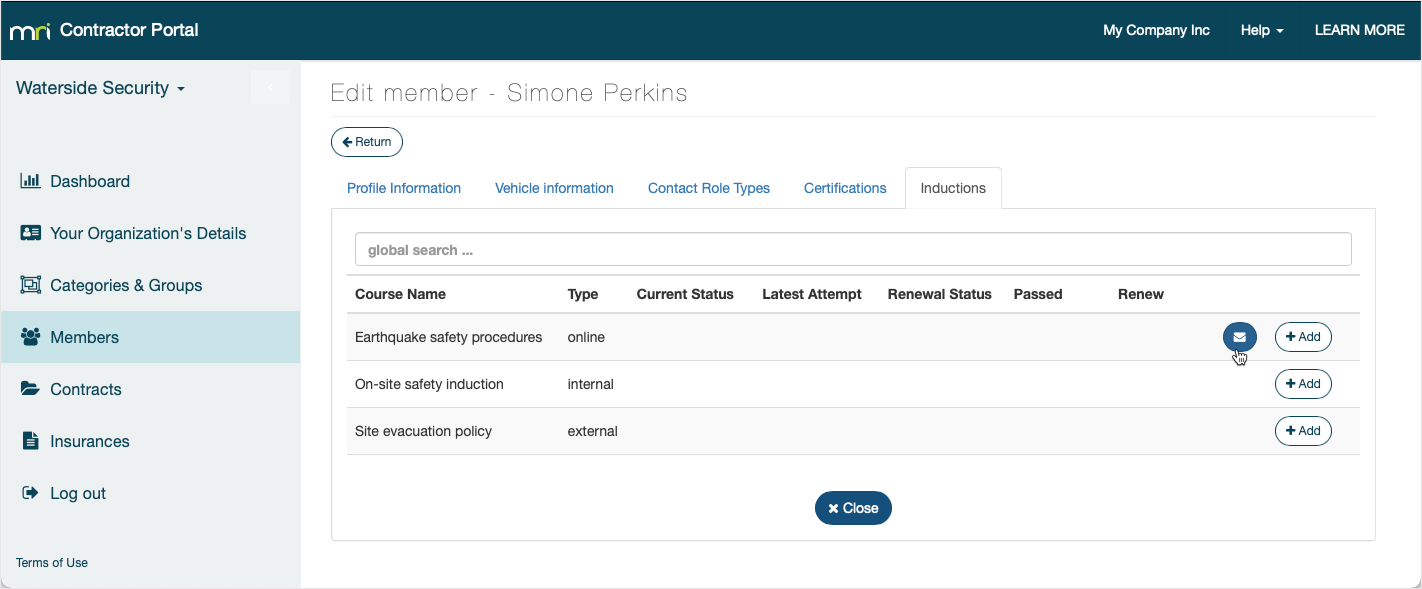
- Select either Email or SMS. A message will appear in the bottom-left of the window to let you know the invite was sent or if there was an error. An error may occur if the relevant information has not been added to the member’s details.
- Click Close.
The course’s current status will change to Invite Sent and the version number will appear.
If you’d like to cancel the invitation and make the link inactive, click Remove next to this record. An email will still be sent to the member when they are invited but their unique link will go to a page with an error.
You will be able to see when the member has attempted the course and whether or not they have passed from this section.
Manually add an induction course to a member’s profile
When a member passes an Internal or External induction course you will need to manually add this to their profile.
You can also manually add online induction courses. This is available if there was ever an error or similar circumstances that required a manual override rather than sending an invite. If an invite has been sent to a member you will no longer be able to manually add the induction course unless you remove the invite.
To manually add an induction course:
- Click the Add button next to the course.
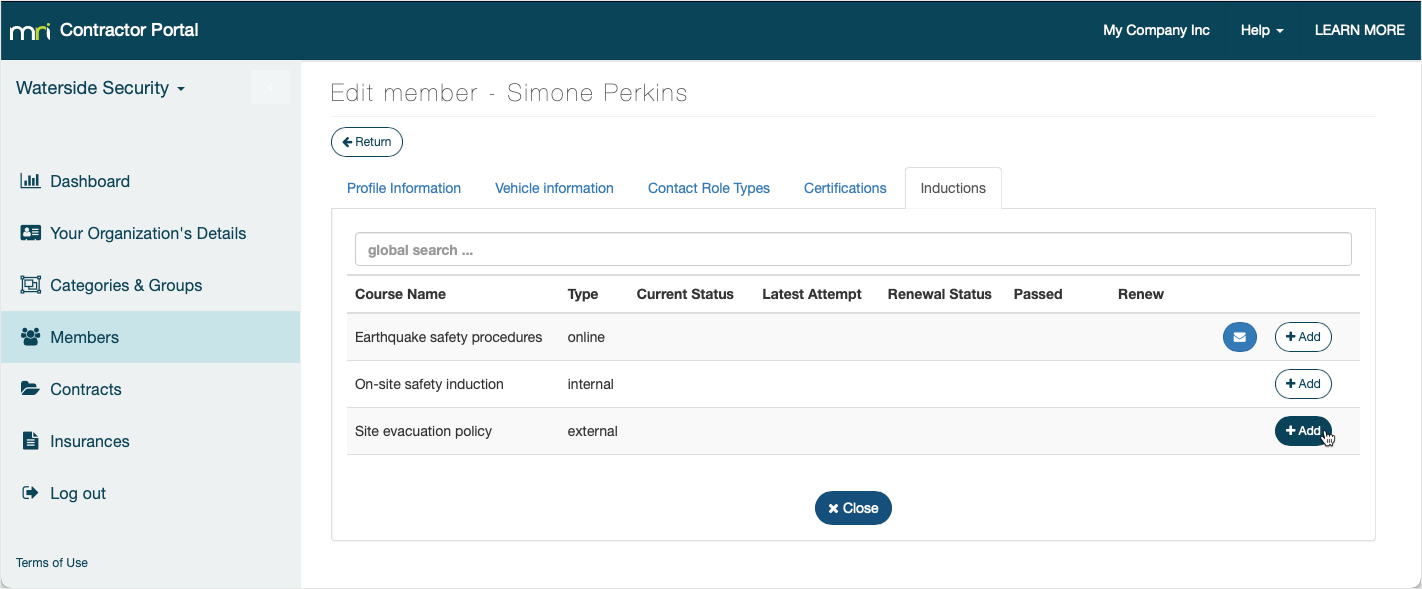
- Select the date the induction course was passed. We recommend using the date picker as any dates added in the incorrect format will default to today’s date.
- Click Add.
The induction course will be added, the current status will change to Passed, and you can now add a supporting document. You can upload PDF, DOC, DOCX, JPG, JPEG, PNG, or GIF file types.
From the list of the member’s inductions:
- Click the documents button next to the induction course.
- Click Add Document.
- Select a file from your computer and click Open.
The file will be automatically uploaded to the Contractor Portal and linked to the induction course.
You can view uploaded documents from this page by clicking the View button next to a document.
You can delete a document by clicking the Remove button.
Click Return to go back to the member details.